16. Interface and application programming
Group Assignment:
My Contribution: Lightbulb Toggle Walkthrough
For the group assignment, I implemented a Lightbulb Toggle system using Arduino and Python with PyQt5. This project demonstrated bidirectionla communication between a desktop GUI and an embedded board.
What I learned:
-
Serial Communication: Understanding how to maintain state synchronization without creating infinite loops. When the GUI toggles the LED, it sends a command. When the physical button on D7 is pressed, the Arduino sends a status update back. Neither side echoes the command back, preventing state loops.
-
State Management: Handling connection states gracefully - disabling controls when no port is open, updating UI colors to reflect connection status, and cleaning up resources properly on close.
This experience gave me a foundation in creating desktop interfaces for embedded systems, which directly influenced my individual assignment where I built a Python GUI to visualize NeoPixel colors.
Individual Assignment: Potentiometer-Controlled NeoPixel Color Control
Overview
For my individual assignment, I created an interactive system that uses a potentiometer (input device) to control the color of NeoPixel LEDs (output device). I explored four progressive approaches:
Stage 1: Reading analog input and displaying values in Serial Monitor
Stage 2: Mapping analog values to specific RGB colors
Stage 3: Using HSV color space for smooth continuous color transitions
Stage 4: Python GUI visualizer that mirrors the NeoPixel colors
This project demonstrates input sensing, analog-to-digital conversion, and output control using the Seeed XIAO RP2040.
Hardware Setup
| Component | XIAO Pin | GPIO | Function |
|---|---|---|---|
| Potentiometer | A1 | GPIO27 | Analog input for color control |
| NeoPixel Strip | D10 | GPIO12 | RGB LED output |
Wiring Diagram:
Potentiometer:
  Left pin  → 3.3V
  Middle pin → A1 (GPIO27)
  Right pin → GND

NeoPixel Strip:
  VCC  → 5V
  GND  → GND
  DIN  → D10 (GPIO12)
Stage 1: AnalogReadSerial - Reading the Potentiometer
Objective: Understand how to read analog values from the potentiometer and verify the input range.
At first, I used example from Arduino to understand how the potentiometer works.
Then I try to print value after mapping.
/*
  AnalogReadSerial - Basic analog input reading
  Reads potentiometer on A1 and prints values to Serial Monitor
*/

void setup() {
  // Initialize serial communication at 9600 baud
  Serial.begin(9600);
}

void loop() {
  // Read analog value from potentiometer (0-1023)
  int sensorValue = analogRead(A1);

  // Map raw value to 0-10 range for easier interpretation
  int val = map(sensorValue, 0, 1023, 0, 10);

  // Print to Serial Monitor
  Serial.println(val);

  delay(1);  // Small delay for stability
}
Results: - Rotating the potentiometer from minimum to maximum produced values from 0 to 10 - Serial Monitor displayed real-time values as the knob was turned - Verified that the analog input was working correctly before proceeding
Analog Read Result video:
Stage 2: RGB Control - Discrete Color Selection
Objective: Map analog values to specific RGB colors for a discrete color-changing effect.
In this part, I prompt AI to code for me for the basic understand. The code provided by AI did not work at first. I had to check and fix pins, and code for lighting the pixels up. I have added some descriptions in the code in order to understand what is running.
With this stage, I need an extra function setNeoPixelColor() to pick the color for neopixels from 0-10 value range. It took lots of time to find and pick the colors.
#include <Adafruit_NeoPixel.h>

// NeoPixel configuration
#define NEOPIXEL_PIN D10      // NEOPIXELS at D10
#define NUM_PIXELS 5          // Numbers of Neopixels

Adafruit_NeoPixel pixel(NUM_PIXELS, NEOPIXEL_PIN, NEO_GRB + NEO_KHZ800);

void setup() {
  // Initialize the serial monitor with 9600 baud
  Serial.begin(9600);

  // Initialize the Neopixels
  pixel.begin();
  pixel.setBrightness(50);    // (0-255) brightness of each pixel
  pixel.show();
}

void loop() {
  // Read analog input on A1
  int sensorValue = analogRead(A1);

  // Map 0-1023 to 0-10 range (11 discrete colors)
  int val = map(sensorValue, 0, 1023, 0, 10);

  // Print for debugging
  Serial.print("Sensor: ");
  Serial.print(sensorValue);
  Serial.print(" | Mapped: ");
  Serial.print(val);
  Serial.print(" | Color: ");

  // Set color based on mapped value
  setNeoPixelColor(val);

  delay(50);
}

void setNeoPixelColor(int value) {
  uint32_t color;

  switch(value) {
    case 0:
      color = pixel.Color(255, 0, 0);      // Red
      Serial.println("RED");
      break;
    case 1:
      color = pixel.Color(255, 50, 0);     // Orange-red
      Serial.println("ORANGE-RED");
      break;
    case 2:
      color = pixel.Color(255, 100, 0);    // Orange
      Serial.println("ORANGE");
      break;
    case 3:
      color = pixel.Color(255, 150, 0);    // Yellow-orange
      Serial.println("YELLOW-ORANGE");
      break;
    case 4:
      color = pixel.Color(255, 200, 0);    // Yellow
      Serial.println("YELLOW");
      break;
    case 5:
      color = pixel.Color(0, 255, 0);      // Green
      Serial.println("GREEN");
      break;
    case 6:
      color = pixel.Color(0, 255, 100);    // Light green
      Serial.println("LIGHT GREEN");
      break;
    case 7:
      color = pixel.Color(0, 200, 255);    // Cyan
      Serial.println("CYAN");
      break;
    case 8:
      color = pixel.Color(0, 100, 255);    // Light blue
      Serial.println("LIGHT BLUE");
      break;
    case 9:
      color = pixel.Color(0, 0, 255);      // Blue
      Serial.println("BLUE");
      break;
    case 10:
      color = pixel.Color(255, 0, 255);    // Purple
      Serial.println("PURPLE");
      break;
    default:
      color = pixel.Color(0, 0, 0);        // Off
      Serial.println("OFF");
      break;
  }

  // Apply color to all NeoPixels
  for(uint16_t i = 0; i < NUM_PIXELS; i++) {
    pixel.setPixelColor(i, color);
  }
  pixel.show();
}
Results:
- As the potentiometer was rotated, the NeoPixels cycled through 11 distinct colors
- Each color change was clearly visible and corresponded to the mapped value range
- Serial Monitor confirmed the color name for each position
| Value | Color | RGB Value |
|---|---|---|
| 0 | Red | (255,0,0) |
| 2 | Orange | (255,100,0) |
| 4 | Yellow | (255,200,0) |
| 5 | Green | (0,255,0) |
| 7 | Cyan | (0,200,255) |
| 9 | Blue | (0,0,255) |
| 10 | Purple | (255,0,255) |
RGB Potentiometer result video
Stage 3: HSV Control - Smooth Continuous Color Transition
Objective: Use HSV (Hue, Saturation, Value) color space for seamless, smooth color transitions across the full spectrum.
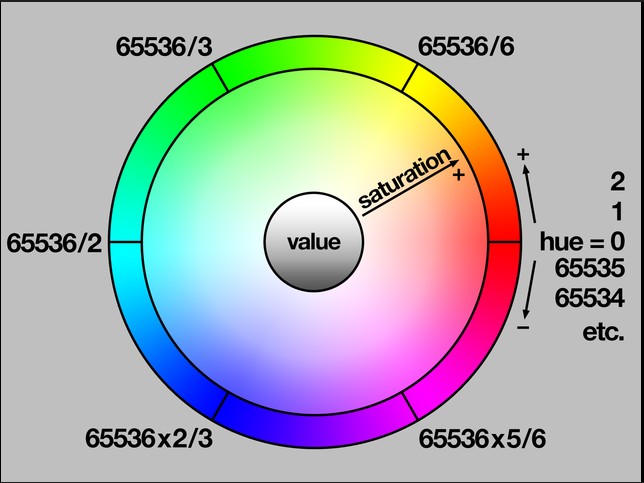
I got this idea from Toni - Fab Lab Oulu staff. Due to the distinction from RGB, I and Toni came up with a smoother transition based on HSV.
With this, I changed the map 0-65536 range correspond to a full circle of color. However I did not want to repeat the RED so I took 65536 x 7/8
After this idea, I can remove the extra function and shorten the code.
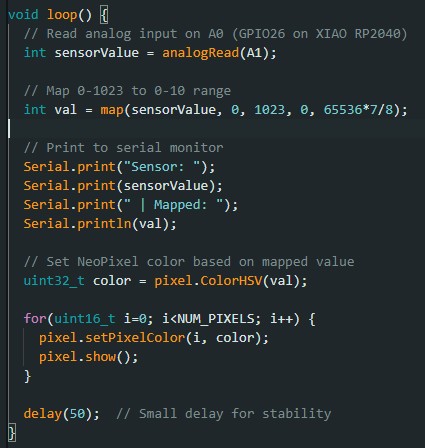
In this stage, I have not coded the color part. If you want to show color on the Serial Monitor. You also need an extra function to work on the val parameter.
#include <Adafruit_NeoPixel.h>

// NeoPixel configuration
#define NEOPIXEL_PIN D10      // GPIO12
#define NUM_PIXELS 5          // 5 NeoPixels

Adafruit_NeoPixel pixel(NUM_PIXELS, NEOPIXEL_PIN, NEO_GRB + NEO_KHZ800);

void setup() {
  // Initialize the serial monitor with 9600 baud
  Serial.begin(9600);

  // Initialize the neopixels
  pixel.begin();
  pixel.setBrightness(50);    // brightness (0-255)
  pixel.show();
}

void loop() {
  // Read analog input on A1
  int sensorValue = analogRead(A1);

  // Map 0-1023 to full HSV hue range (0 to 57344)
  // 65536 * 7/8 = 57344 (max hue value for ColorHSV function)
  int val = map(sensorValue, 0, 1023, 0, 65536 * 7 / 8);

  // Print for debugging
  Serial.print("Sensor: ");
  Serial.print(sensorValue);
  Serial.print(" | Value: ");
  Serial.println(val);

  // Create color using HSV (full saturation, full brightness)
  uint32_t color = pixel.ColorHSV(val);

  // Apply color to all NeoPixels
  for(uint16_t i = 0; i < NUM_PIXELS; i++) {
    pixel.setPixelColor(i, color);
  }
  pixel.show();

  delay(50);
}
HSV Color Wheel:
val 0      → Red
val 2466   → Orange
val 8127  → Yellow
val 21637  → Green
val 32768  → Cyan
val 43691  → Blue
val 49552  → Purple
val 57344  → Magenta
Results:
- The NeoPixels now transition smoothly through the entire color spectrum
- No discrete jumps - continuous color change as the knob rotates
- All LEDs display the same color simultaneously
- The effect is visually pleasing and demonstrates the full range of the NeoPixel
HVS result video
Because the bad connection of junping wires, so I soldered the male pins of the jumping wires into potentiometer legs for better data. However, there are sometimes noise from the connections.
Stage 4: Python GUI Visualizer
Objective: Create a desktop application that reads the Arduino’s serial output and displays the current color in real-time, matching the NeoPixel colors
After learning from my group assignment with PyQt5, I use AI to generate a python file based on lightbulb_toggle.py.
How It Work:
After the file is generated, I dived into the file to understand it.
The Arduino sends data over serial in the format:
Sensor: 512 | Value: 28672
The python application:
- Connects to the Arduino via serial port
- Parses the incoming data to extract the sensor value and hue value
- Converts the hue value to RGB using the same HSV-to-RGB formula as the NeoPixel library
- Updates the window background color to match the NeoPixel
- Displays sensor value, hue value, and RGB components
How the python inteface works:
| Component | Function |
|---|---|
| ColorDisplayWidget | Large area showing the current color |
| ValueDisplayWidget | Show sensor value, hue, and RGB value |
| Serial Polling | QTimer checks for new data every 20ms |
| Data Parsing | Extracts “Sendor:” and “Value:” from serial |
| HSV to RGB | Converts hue to RGB using same formula as NeoPixel |
Code:
#!/usr/bin/env python3
"""
HSV NeoPixel Color Visualizer
By Fab Academy Student

This interface connects to the Arduino running HSV_potentialmeter.ino,
reads the sensor values, and displays the corresponding color in the window.
The background color matches the NeoPixel colors in real-time.

Requires
--------
    pip install pyserial pyqt5
"""

import sys
from typing import Optional

import serial
import serial.tools.list_ports

from PyQt5.QtWidgets import (
    QApplication,
    QMainWindow,
    QWidget,
    QVBoxLayout,
    QHBoxLayout,
    QLabel,
    QPushButton,
    QComboBox,
    QSizePolicy,
    QFrame,
)
from PyQt5.QtCore import (
    Qt,
    QTimer,
    QRect,
    pyqtSignal,
)
from PyQt5.QtGui import (
    QPainter,
    QColor,
    QFont,
    QBrush,
    QLinearGradient,
    QPalette,
    QPixmap,
)


# =============================================================================
# CONSTANTS
# =============================================================================

BAUD_RATE = 9600  # Must match the Arduino sketch

# Color palette
COL_BG_DARK = QColor(20, 20, 28)
COL_PANEL_BG = QColor(35, 35, 45)
COL_TEXT = QColor(220, 220, 230)
COL_TEXT_DIM = QColor(150, 150, 165)
COL_BORDER = QColor(80, 80, 95)
COL_VALUE_HIGHLIGHT = QColor(100, 220, 130)


# =============================================================================
# COLOR WIDGET
# =============================================================================

class ColorDisplayWidget(QWidget):
    """
    Custom widget that displays a solid color background.
    Updates its color when new HSV values are received.
    """

    def __init__(self, parent=None):
        super().__init__(parent)
        self.current_color = QColor(50, 50, 60)  # Default dark gray
        self.setMinimumSize(400, 300)
        self.setAutoFillBackground(True)

    def update_color(self, r: int, g: int, b: int) -> None:
        """Update the displayed color and refresh the widget."""
        self.current_color = QColor(r, g, b)
        self.update()  # Schedule repaint

    def paintEvent(self, event) -> None:
        """Paint the widget with the current color."""
        painter = QPainter(self)
        painter.setRenderHint(QPainter.Antialiasing)

        # Fill the entire widget with the current color
        painter.fillRect(self.rect(), self.current_color)

        # Draw a subtle inner glow effect
        gradient = QLinearGradient(0, 0, 0, self.height())
        gradient.setColorAt(0.0, QColor(255, 255, 255, 30))
        gradient.setColorAt(0.5, QColor(255, 255, 255, 0))
        gradient.setColorAt(1.0, QColor(0, 0, 0, 30))
        painter.fillRect(self.rect(), gradient)

        painter.end()


# =============================================================================
# VALUE DISPLAY WIDGET
# =============================================================================

class ValueDisplayWidget(QFrame):
    """
    Widget that displays sensor readings and RGB values in a clean card layout.
    """

    def __init__(self, parent=None):
        super().__init__(parent)
        self.setStyleSheet(self._card_style())
        self.setFixedHeight(120)

        self.sensor_value = 0
        self.hue_value = 0
        self.rgb_values = (0, 0, 0)

        self._build_ui()

    def _build_ui(self):
        """Create the layout for value displays."""
        layout = QHBoxLayout(self)
        layout.setContentsMargins(20, 15, 20, 15)
        layout.setSpacing(30)

        # Sensor Value Display
        sensor_widget = QWidget()
        sensor_layout = QVBoxLayout(sensor_widget)
        sensor_layout.setSpacing(5)

        sensor_label = QLabel("📊 SENSOR VALUE")
        sensor_label.setStyleSheet("color: rgb(150, 150, 165); font-size: 11px; font-weight: bold;")
        sensor_layout.addWidget(sensor_label)

        self.sensor_display = QLabel("0")
        self.sensor_display.setStyleSheet("color: rgb(100, 220, 130); font-size: 32px; font-weight: bold; font-family: monospace;")
        sensor_layout.addWidget(self.sensor_display)

        layout.addWidget(sensor_widget)

        # Separator line
        line = QFrame()
        line.setFrameShape(QFrame.VLine)
        line.setStyleSheet("background-color: rgb(80, 80, 95);")
        line.setFixedWidth(2)
        layout.addWidget(line)

        # Hue Value Display
        hue_widget = QWidget()
        hue_layout = QVBoxLayout(hue_widget)
        hue_layout.setSpacing(5)

        hue_label = QLabel("🎨 HUE VALUE")
        hue_label.setStyleSheet("color: rgb(150, 150, 165); font-size: 11px; font-weight: bold;")
        hue_layout.addWidget(hue_label)

        self.hue_display = QLabel("0")
        self.hue_display.setStyleSheet("color: rgb(220, 220, 230); font-size: 32px; font-weight: bold; font-family: monospace;")
        hue_layout.addWidget(self.hue_display)

        layout.addWidget(hue_widget)

        # Separator line
        line2 = QFrame()
        line2.setFrameShape(QFrame.VLine)
        line2.setStyleSheet("background-color: rgb(80, 80, 95);")
        line2.setFixedWidth(2)
        layout.addWidget(line2)

        # RGB Value Display
        rgb_widget = QWidget()
        rgb_layout = QVBoxLayout(rgb_widget)
        rgb_layout.setSpacing(5)

        rgb_label = QLabel("🌈 RGB VALUES")
        rgb_label.setStyleSheet("color: rgb(150, 150, 165); font-size: 11px; font-weight: bold;")
        rgb_layout.addWidget(rgb_label)

        rgb_value_layout = QHBoxLayout()
        rgb_value_layout.setSpacing(8)

        self.r_display = QLabel("R: 0")
        self.r_display.setStyleSheet("color: rgb(255, 100, 100); font-size: 18px; font-weight: bold;")
        self.g_display = QLabel("G: 0")
        self.g_display.setStyleSheet("color: rgb(100, 255, 100); font-size: 18px; font-weight: bold;")
        self.b_display = QLabel("B: 0")
        self.b_display.setStyleSheet("color: rgb(100, 100, 255); font-size: 18px; font-weight: bold;")

        rgb_value_layout.addWidget(self.r_display)
        rgb_value_layout.addWidget(self.g_display)
        rgb_value_layout.addWidget(self.b_display)
        rgb_layout.addLayout(rgb_value_layout)

        layout.addWidget(rgb_widget)

    def update_values(self, sensor: int, hue: int, rgb: tuple) -> None:
        """Update all value displays."""
        self.sensor_value = sensor
        self.hue_value = hue
        self.rgb_values = rgb

        self.sensor_display.setText(str(sensor))
        self.hue_display.setText(str(hue))
        self.r_display.setText(f"R: {rgb[0]}")
        self.g_display.setText(f"G: {rgb[1]}")
        self.b_display.setText(f"B: {rgb[2]}")

    @staticmethod
    def _card_style() -> str:
        return """
            QFrame {
                background-color: rgb(35, 35, 45);
                border-radius: 12px;
                border: 1px solid rgb(80, 80, 95);
            }
        """


# =============================================================================
# COLOR PREVIEW WIDGET
# =============================================================================

class ColorPreviewWidget(QFrame):
    """
    Widget that shows a small color swatch preview of the current color.
    """

    def __init__(self, parent=None):
        super().__init__(parent)
        self.setFixedSize(80, 80)
        self.current_color = QColor(50, 50, 60)
        self.setStyleSheet(self._preview_style())

    def _preview_style(self) -> str:
        return """
            QFrame {
                border-radius: 12px;
                border: 2px solid rgb(100, 100, 120);
            }
        """

    def update_color(self, r: int, g: int, b: int) -> None:
        """Update the preview color."""
        self.current_color = QColor(r, g, b)
        self.setStyleSheet(f"""
            QFrame {{
                background-color: rgb({r}, {g}, {b});
                border-radius: 12px;
                border: 2px solid rgb(100, 100, 120);
            }}
        """)

    def paintEvent(self, event) -> None:
        """Paint the preview with the current color."""
        painter = QPainter(self)
        painter.setRenderHint(QPainter.Antialiasing)
        painter.fillRect(self.rect(), self.current_color)
        painter.end()


# =============================================================================
# MAIN WINDOW
# =============================================================================

class MainWindow(QMainWindow):
    """
    Main application window that connects to Arduino and displays the color.
    """

    def __init__(self):
        super().__init__()
        self.setWindowTitle("HSV NeoPixel Color Visualizer")
        self.setMinimumSize(500, 500)

        self.serial_port: Optional[serial.Serial] = None
        self.current_hue = 0
        self.current_sensor = 0

        self._build_ui()
        self._refresh_ports()

        # Timer for polling serial data
        self.poll_timer = QTimer(self)
        self.poll_timer.timeout.connect(self._poll_serial)
        self.poll_timer.start(20)  # 50 times per second

    def _build_ui(self) -> None:
        """Build the user interface."""
        root = QWidget()
        root.setStyleSheet("background-color: rgb(20, 20, 28);")
        self.setCentralWidget(root)

        main_layout = QVBoxLayout(root)
        main_layout.setContentsMargins(20, 20, 20, 20)
        main_layout.setSpacing(15)

        # ---- Header Section ----
        header_layout = QHBoxLayout()

        # Title
        title_label = QLabel("🎨 HSV NeoPixel Visualizer")
        title_label.setStyleSheet("color: rgb(220, 220, 230); font-size: 20px; font-weight: bold;")
        header_layout.addWidget(title_label)

        header_layout.addStretch()

        # Color Preview
        self.preview = ColorPreviewWidget()
        header_layout.addWidget(self.preview)

        main_layout.addLayout(header_layout)

        # ---- Subtitle ----
        subtitle = QLabel("Real-time color matching with NeoPixel")
        subtitle.setStyleSheet("color: rgb(150, 150, 165); font-size: 12px;")
        main_layout.addWidget(subtitle)

        # ---- Main Color Display ----
        self.color_display = ColorDisplayWidget()
        self.color_display.setMinimumHeight(350)
        main_layout.addWidget(self.color_display)

        # ---- Value Display Panel ----
        self.value_display = ValueDisplayWidget()
        main_layout.addWidget(self.value_display)

        # ---- Serial Control Panel ----
        control_panel = QFrame()
        control_panel.setStyleSheet(self._panel_style())
        control_layout = QHBoxLayout(control_panel)
        control_layout.setContentsMargins(15, 10, 15, 10)

        # Port selector
        port_label = QLabel("Serial Port:")
        port_label.setStyleSheet("color: rgb(220, 220, 230);")
        control_layout.addWidget(port_label)

        self.port_combo = QComboBox()
        self.port_combo.setStyleSheet(self._combo_style())
        self.port_combo.setMinimumWidth(150)
        control_layout.addWidget(self.port_combo)

        # Buttons
        self.refresh_btn = self._make_btn("Refresh", self._refresh_ports)
        self.open_btn = self._make_btn("Open", self._open_port)
        self.close_btn = self._make_btn("Close", self._close_port)

        control_layout.addWidget(self.refresh_btn)
        control_layout.addWidget(self.open_btn)
        control_layout.addWidget(self.close_btn)

        control_layout.addStretch()

        # Status indicator
        self.status_label = QLabel("● Disconnected")
        self.status_label.setStyleSheet("color: rgb(200, 80, 80); font-weight: bold;")
        control_layout.addWidget(self.status_label)

        main_layout.addWidget(control_panel)

        # ---- Instruction Label ----
        instruction = QLabel("💡 Connect to Arduino and rotate the potentiometer to see the color change")
        instruction.setStyleSheet("color: rgb(100, 100, 110); font-size: 11px;")
        instruction.setAlignment(Qt.AlignCenter)
        main_layout.addWidget(instruction)

        self.setFixedSize(600, 680)

    def _make_btn(self, label: str, slot) -> QPushButton:
        """Create a styled button."""
        btn = QPushButton(label)
        btn.setFixedHeight(32)
        btn.setStyleSheet(self._btn_style())
        btn.clicked.connect(slot)
        return btn

    # ------------------------------------------------------------- Serial --

    def _refresh_ports(self) -> None:
        """Refresh the list of available serial ports."""
        self.port_combo.clear()
        ports = sorted(serial.tools.list_ports.comports(), key=lambda p: p.device)
        for p in ports:
            self.port_combo.addItem(p.device)
        if self.port_combo.count() == 0:
            self.port_combo.addItem("No ports found")

    def _open_port(self) -> None:
        """Open the selected serial port."""
        name = self.port_combo.currentText()
        if not name or name == "No ports found":
            return
        try:
            self.serial_port = serial.Serial(name, BAUD_RATE, timeout=0)
            self.status_label.setText("● Connected")
            self.status_label.setStyleSheet("color: rgb(100, 220, 130); font-weight: bold;")
            self.port_combo.setStyleSheet(self._combo_style(highlight=True))
            print(f"Opened: {name}")
        except serial.SerialException as e:
            print(f"Could not open {name}: {e}")
            self.status_label.setText("● Connection Failed")
            self.status_label.setStyleSheet("color: rgb(200, 80, 80); font-weight: bold;")

    def _close_port(self) -> None:
        """Close the serial port."""
        if self.serial_port and self.serial_port.is_open:
            self.serial_port.close()
        self.serial_port = None
        self.status_label.setText("● Disconnected")
        self.status_label.setStyleSheet("color: rgb(200, 80, 80); font-weight: bold;")
        self.port_combo.setStyleSheet(self._combo_style())
        print("Port closed.")

    def _poll_serial(self) -> None:
        """
        Poll the serial port for incoming data.
        The Arduino sends: "Sensor: [value] | Mapped: [hue]"
        We need to parse these lines to extract the values.
        """
        if not self.serial_port or not self.serial_port.is_open:
            return

        try:
            while self.serial_port.in_waiting:
                raw = self.serial_port.readline()
                line = raw.decode("utf-8", errors="ignore").strip()

                if line:
                    self._parse_message(line)

        except serial.SerialException:
            self._close_port()

    def _parse_message(self, line: str) -> None:
        """
        Parse the serial message from Arduino.
        Expected format: "Sensor: 512 | Mapped: 28672"
        """
        try:
            # Look for "Sensor:" and "Mapped:" patterns
            if "Sensor:" in line and "Mapped:" in line:
                parts = line.split("|")

                # Extract sensor value
                sensor_part = parts[0].split("Sensor:")[1].strip()
                sensor_value = int(sensor_part)

                # Extract mapped value (hue)
                mapped_part = parts[1].split("Mapped:")[1].strip()
                hue_value = int(mapped_part)

                self.current_sensor = sensor_value
                self.current_hue = hue_value

                # Convert hue to RGB using the same formula as NeoPixel
                rgb = self._hue_to_rgb(hue_value)

                # Update the display
                self.color_display.update_color(rgb[0], rgb[1], rgb[2])
                self.preview.update_color(rgb[0], rgb[1], rgb[2])
                self.value_display.update_values(sensor_value, hue_value, rgb)

        except (ValueError, IndexError) as e:
            # Silently ignore parsing errors
            pass

    def _hue_to_rgb(self, hue: int) -> tuple:
        """
        Convert hue value (0-57344) to RGB.
        This mimics the NeoPixel ColorHSV conversion.
        """
        # Normalize hue to 0-360 degrees
        hue_deg = (hue / 57344.0) * 360.0

        # Convert HSV to RGB (full saturation and value for max brightness)
        h = hue_deg / 60.0
        i = int(h)
        f = h - i

        p = 0
        q = int(255 * (1 - f))
        t = int(255 * f)

        if i == 0:
            r, g, b = 255, t, p
        elif i == 1:
            r, g, b = q, 255, p
        elif i == 2:
            r, g, b = p, 255, t
        elif i == 3:
            r, g, b = p, q, 255
        elif i == 4:
            r, g, b = t, p, 255
        else:
            r, g, b = 255, p, q

        return (r, g, b)

    # ------------------------------------------------------------ Styles --

    @staticmethod
    def _btn_style() -> str:
        return """
            QPushButton {
                background-color: rgb(65, 65, 78);
                color: rgb(210, 210, 210);
                border: 1px solid rgb(110, 110, 110);
                border-radius: 5px;
                padding: 0 12px;
                font-size: 12px;
            }
            QPushButton:hover {
                background-color: rgb(80, 80, 95);
            }
            QPushButton:pressed {
                background-color: rgb(50, 50, 62);
            }
        """

    @staticmethod
    def _combo_style(highlight: bool = False) -> str:
        border = "rgb(100, 220, 130)" if highlight else "rgb(90, 90, 90)"
        text = "rgb(100, 220, 130)" if highlight else "rgb(210, 210, 210)"
        return f"""
            QComboBox {{
                background-color: rgb(45, 45, 52);
                color: {text};
                border: 1px solid {border};
                border-radius: 4px;
                padding: 4px 8px;
                font-size: 12px;
            }}
            QComboBox::drop-down {{ border: none; }}
            QComboBox QAbstractItemView {{
                background-color: rgb(45, 45, 52);
                color: rgb(200, 200, 200);
                selection-background-color: rgb(65, 65, 78);
            }}
        """

    @staticmethod
    def _panel_style() -> str:
        return """
            QFrame {
                background-color: rgb(28, 28, 35);
                border-radius: 8px;
                border: 1px solid rgb(60, 60, 70);
            }
        """

    def closeEvent(self, event) -> None:
        """Clean up before closing."""
        self._close_port()
        self.poll_timer.stop()
        event.accept()


# =============================================================================
# ENTRY POINT
# =============================================================================

if __name__ == "__main__":
    app = QApplication(sys.argv)
    window = MainWindow()
    window.show()
    sys.exit(app.exec())
Result:
The python interface succesfully:
- Connects to the Arduino via serial port
- Reads and parses the HSV values in real-time
- Updates the window background to match the NeoPixel color
- Displays sensor and color information
- Provides a clean, professionla desktop interface
This extension demonstrates how embedded systems can be combined with desktop applications to create rich user experiences.
Before Connection
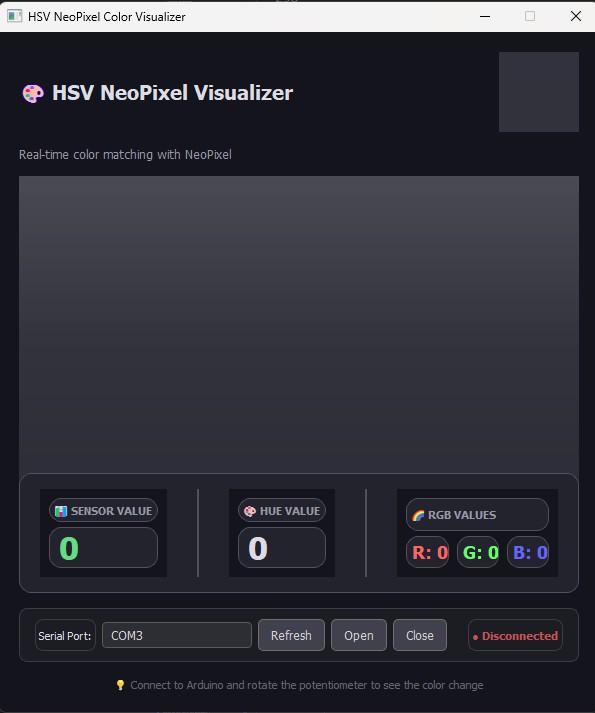
Visualization video:
Comparison: RGB vs HSV Approach
| Aspect | RGB (Discrete) | HSV (Continuous) |
|---|---|---|
| Color Transitions | 11 discrete colors | Continuous spectrum |
| Code Complexity | Switch statement, manual RGB values | Single ColorHSV function |
| Smoothness | Jumps between colors | Seamless transitions |
| Memory Usage | Larger code | More compact code |
| User Experience | Preset colors only | Full color control |
Testing and Results
| Test Stage | Input | Expected Output | Actual Result |
|---|---|---|---|
| Stage 1 | Rotate potentiometer | Values 0-10 in Serial Monitor | ✓ Passed |
| Stage 2 | Rotate potentiometer | 11 discrete colors on NeoPixels | ✓ Passed |
| Stage 3 | Rotate potentiometer | Continuous color spectrum | ✓ Passed |
| Stage 4 | Rotate potentiometer | Python window color matches NeoPixel | ✓ Passed |
Observations:
- Analog Resolution: The 10-bit ADC (0-1023) provided sufficient resolution for smooth control
- NeoPixel Response: Immediate response to input changes with no noticeable lag
- HSV Advantage: Much smoother transitions compared to discrete RGB mapping
- Python Interface: Real-time color visualization with less than 50ms latency
Troubleshooting:
Issue: Built-in NeoPixel not lighting up initially
- Solution: Try to use external NeoPixel, then try again with built-in one and figured about the wrong pins
Issue: HSV colors were not matching expected spectrum
- Solution: Adjusted the mapping range to
65536 * 7/8(57344) for full hue rotation
Issue: Python not receiving serial data
- Solution: Ensured baud rate matched (9600) and used timeout=0 for non-blocking reads
Reflection
This assignment provided valuable experience in:
- Analog Input: Understanding how to read and map analog signals from a potentiometer
- NeoPixel Library: Learning the Adafruit_NeoPixel library for RGB LED control
- Color Theory: Exploring the difference between RGB and HSV color spaces
- Progressive Development: Building complexity incrementally (reading → discrete colors → continuous colors)
- Serial Debugging: Using Serial Monitor to verify input values during development
- Application Programming: Creating a Python GUI with PyQt5 to visualize embedded data
Key Takeaway: The HSV approach is significantly more efficient and produces better visual results for continuous color control compared to manually mapping RGB values. The ColorHSV() function handles the complex color conversion internally, making the code cleaner and more maintainable.
Files
| File Name | Description |
|---|---|
| AnalogReadSerial.ino | Basic analog input reading example |
RGB_potentialmeter.ino |
Discrete RGB color control with potentiometer |
HSV_potentialmeter.ino |
Continuous HSV color control with potentiometer |
HSV_visualize.py |
Python PyQt5 interface for color visualization |